Mar, 2015
[s2Stream /] Shortcode Documentation
Table of Contents
- Basic Download Restrictions (Required)
- Amazon S3/CDN Storage Option
- Amazon CloudFront Storage/Distribution Option
- Uploading Sample Audio/Video Files
- Installing JW Player v7
- [s2Stream /] Shortcode Examples
- JW Player v7 (HTTP MP4 Video via Rewrite URLs; S3/CloudFront Not Required)
- JW Player v7 (RTMP Stream + MP4 Video Fallback; Both S3/CloudFront Required)
- JW Player v7 (RTMP Video Stream Only; Both S3/CloudFront Required)
- JW Player v7 (HTTP MP3 Audio via Rewrite URLs; S3/CloudFront Not Required)
- JW Player v7 (RTMP Stream + MP3 Audio Fallback; Both S3/CloudFront Required)
- JW Player v7 (RTMP Audio Stream Only; Both S3/CloudFront Required)
- [s2Stream /] Shortcode Attributes Explained
- Mobile Devices: [s2Stream /] Shortcode & JW Player Considerations
- Advanced Techniques (WordPress Theme Integration)
- Limitations when running on Nginx
Basic Download Restrictions (Required)
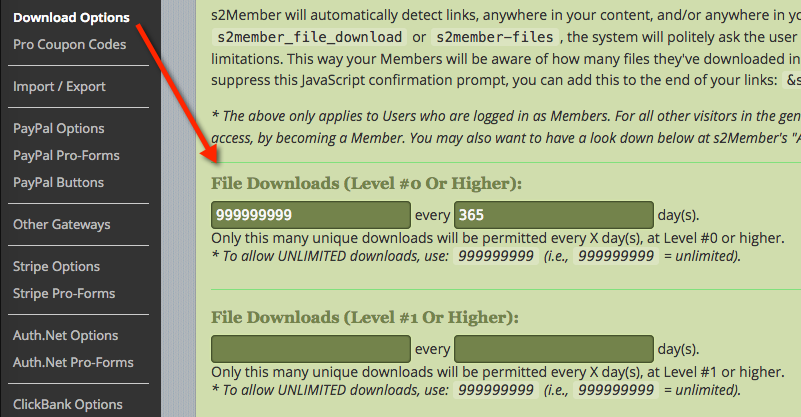
See: WordPress Dashboard → s2Member → Download Options → Basic Download Restrictions. As a security precaution, s2Member will not deliver protected File Downloads (including audio/video files) until you’ve setup Basic Download Restrictions.
Even if you’re not planning to limit the number of File Downloads (i.e., audio/video files are considered File Downloads too), you still need to specify at least one Download Restriction in this section of your Dashboard. This enables s2Member’s File Download functionality on your installation. You can set things up for UNLIMITED File Downloads if you like, but please complete this step first.
Amazon S3/CDN Storage Option
Amazon S3 is designed to make web-scale computing easier for developers. Amazon S3 provides a simple web services interface that can be used to store and retrieve any amount of data, at any time, from anywhere on the web. It gives developers access to the same highly scalable, reliable, secure, fast, inexpensive infrastructure that Amazon uses to run its own global network.
Amazon S3 Not Absolutely Required
We highly recommend that you integrate s2Member with Amazon S3 & Amazon CloudFront. This will improve your experience and your customer’s experience too. It is going to give you better performance and better compatibility across various devices. That being said, this step is not absolutely required. If Amazon S3/Cloudfront is not for you, please feel free to skip this section and the section on Cloudfront also.
However, if you plan to connect s2Member to Amazon Cloudfront you must first integrate with Amazon S3; i.e., s2Member's integration with Cloudfront is dependent upon S3 being integrated also.
Integrating an Amazon S3 Bucket
Step 1: Signup for Amazon S3 Service
See: Amazon S3. Amazon Simple Storage Service (Amazon S3) is storage for the Internet. It is designed to make web-scale computing easier for developers. Amazon S3 provides a simple web services interface that can be used to store and retrieve any amount of data, at any time, from anywhere on the web. It gives developers access to the same highly scalable, reliable, secure, fast, inexpensive infrastructure that Amazon uses to run its own global network.
Step 2: Creating An Amazon S3 Bucket for s2Member
s2Member assumes that you’re creating a new Amazon S3 Bucket specifically for your s2Member installation, and that your Bucket is not available publicly. In other words, if you type this URL into your browser (e.g., http://your-bucket-name.s3.amazonaws.com/) you should get an error that says: Access Denied. That’s good, that’s exactly what you want.
Please create your Amazon S3 Bucket using the Amazon Management Console. Or, some people prefer to use this popular Firefox extension (S3 Fox Organizer).
When you create an Amazon S3 Bucket, it is private by default. So creating the S3 Bucket is all that’s needed here. Don’t worry about permissions or anything like that—the defaults work just fine. It’s a private Bucket (by default) and that’s what you need for s2Member. You can name your Amazon S3 Bucket anything you like. See screenshot below.
Step 3: Give s2Member Your Amazon S3 Bucket Name & Keys
See: WordPress Dashboard → s2Member → Download Options → Amazon S3/CDN Storage Option
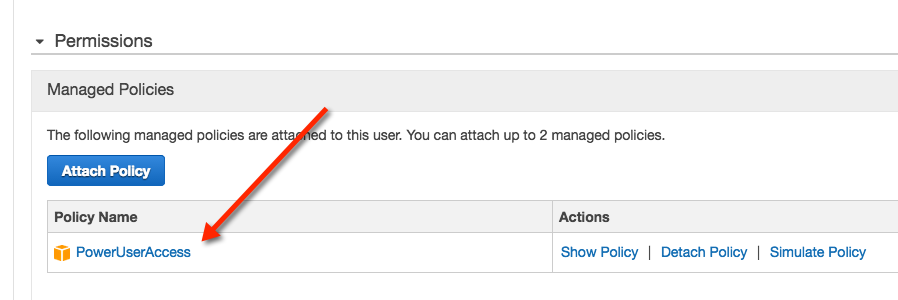
See also: Amazon Web Services Console → IAM → Create New User s2Member will ask for an Access Key ID and a Secret Access Key. Amazon suggests creating a new IAM user and giving s2Member the Access Key ID and Secret Access Key associated with that new IAM user. The IAM user that you create (in your Amazon Web Services Console) also needs to have adequate permissions. Please create a new IAM user with the username s2member and attach a Power User Policy to the s2member user.
Amazon CloudFront Storage/Distribution Option
Amazon CloudFront Not Absolutely Required
s2Member can be configured to only use Amazon S3 (i.e., without Amazon CloudFront). Or, s2Member can be configured to use both Amazon S3 and Amazon CloudFront together (recommended). We highly recommend that you integrate s2Member with Amazon S3 & Amazon CloudFront. This will improve your experience, and your customer’s experience too. It is going to give you better performance and better compatibility across various devices. That being said, this step is not absolutely required. If Amazon S3/CloudFront are not for you, please feel free to skip this section.
However, if you choose not to integrate Amazon CloudFront, you will not be capable of serving true audio/video streams over the RTMP protocol. Audio/video files will play fine, but they won’t stream.
Integrating Amazon CloudFront Distributions
Step 1: Signup for Amazon CloudFront Service
See: Amazon CloudFront. Amazon Simple Storage Service (Amazon S3) combined with Amazon CloudFront; makes RTMP streams possible, and it comes with a number of other advantages too. Amazon CloudFront is a web service for content delivery. It integrates with other Amazon Web Services (such as Amazon S3) to give developers and businesses an easy way to distribute content to end users with low latency, and with high data transfer speeds. Amazon CloudFront delivers your static and streaming content using a global network of edge locations. Requests for your Amazon S3 Bucket Objects (i.e., your protected files) are automatically routed to the nearest edge location, so content is delivered with the best possible performance.
One of the greatest things about Amazon CloudFront is its ability to stream/seek media files in the truest sense of the word. For sites delivering protected FLV/MP4/OGG/WEBM and other streaming audio/video file types over the RTMP protocol, Amazon CloudFront is our recommendation. It’s important to realize what RTMP streams really mean—from a security standpoint. When you stream over the RTMP protocol you are making audio/video files available for playback, but not for download or redistribution. For some business models this is critical_!_ For instance, instead of pushing an entire MP4 video to your clients (which is actually downloadable), an RTMP stream, is just that; it’s a stream. It can be viewed, but not easily downloaded in whole (or redistributed).
Step 2: Give s2Member Your Amazon CloudFront Keys
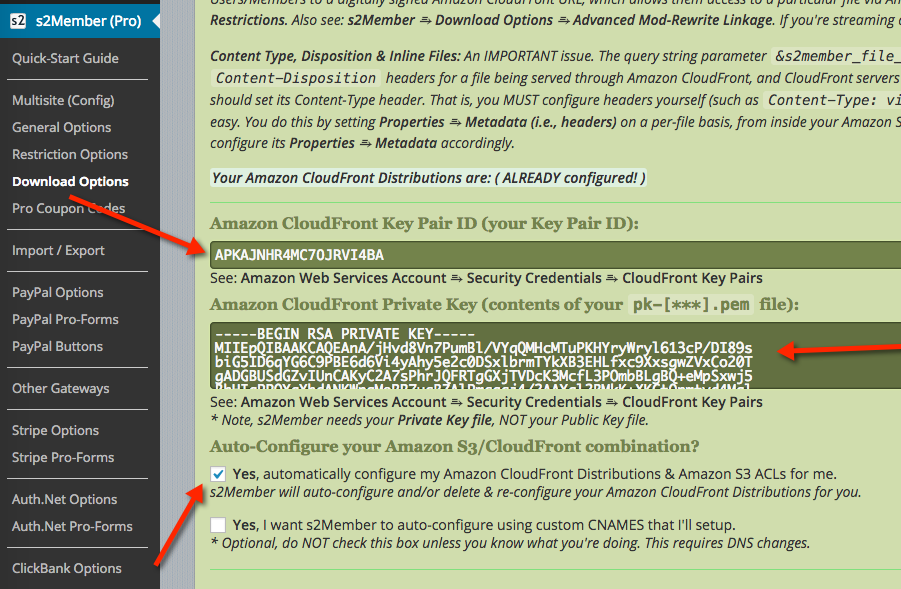
See: WordPress Dashboard → s2Member → Download Options → Amazon S3/CloudFront CDN Delivery Option
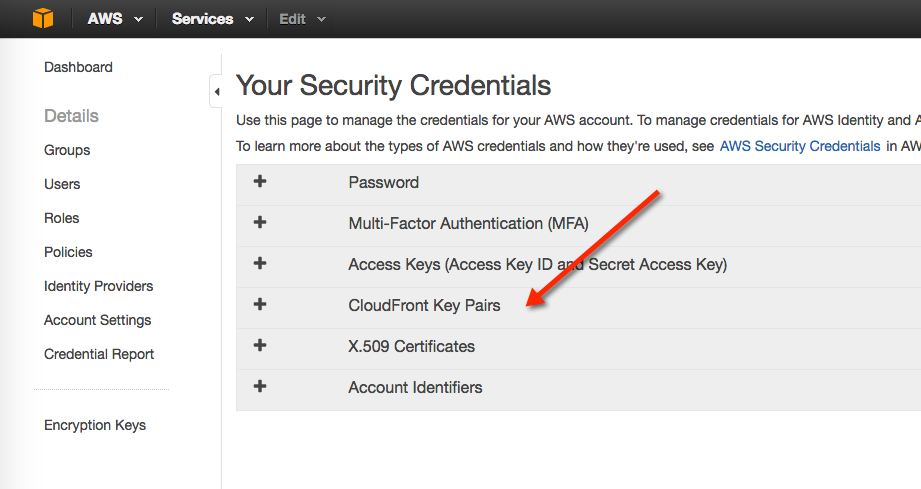
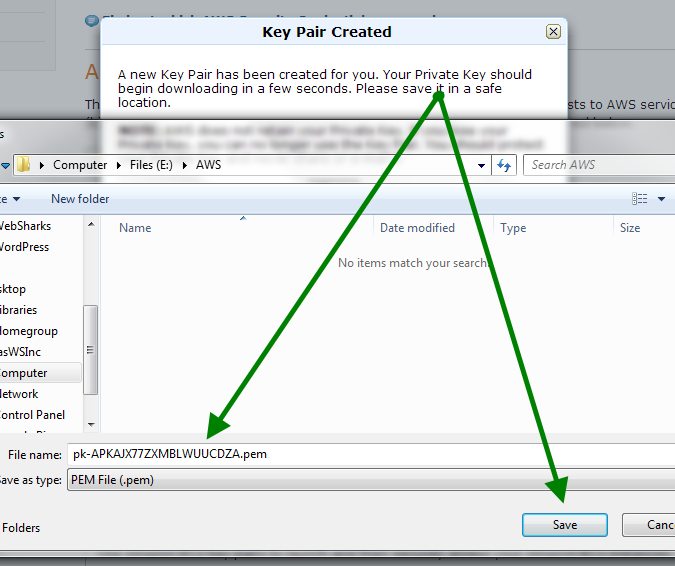
See also: Amazon Management Console → Security Credentials → Cloudfront Key Pairs You will need to generate a new Cloudfront Key Pair here. When you do this you'll be prompted to download both a Public Key and Private Key. s2Member will need your Private Key (PEM) file, so be sure to save this in a safe place. You will also get a Cloudfront Access Key ID in this step—s2Member needs that too please.
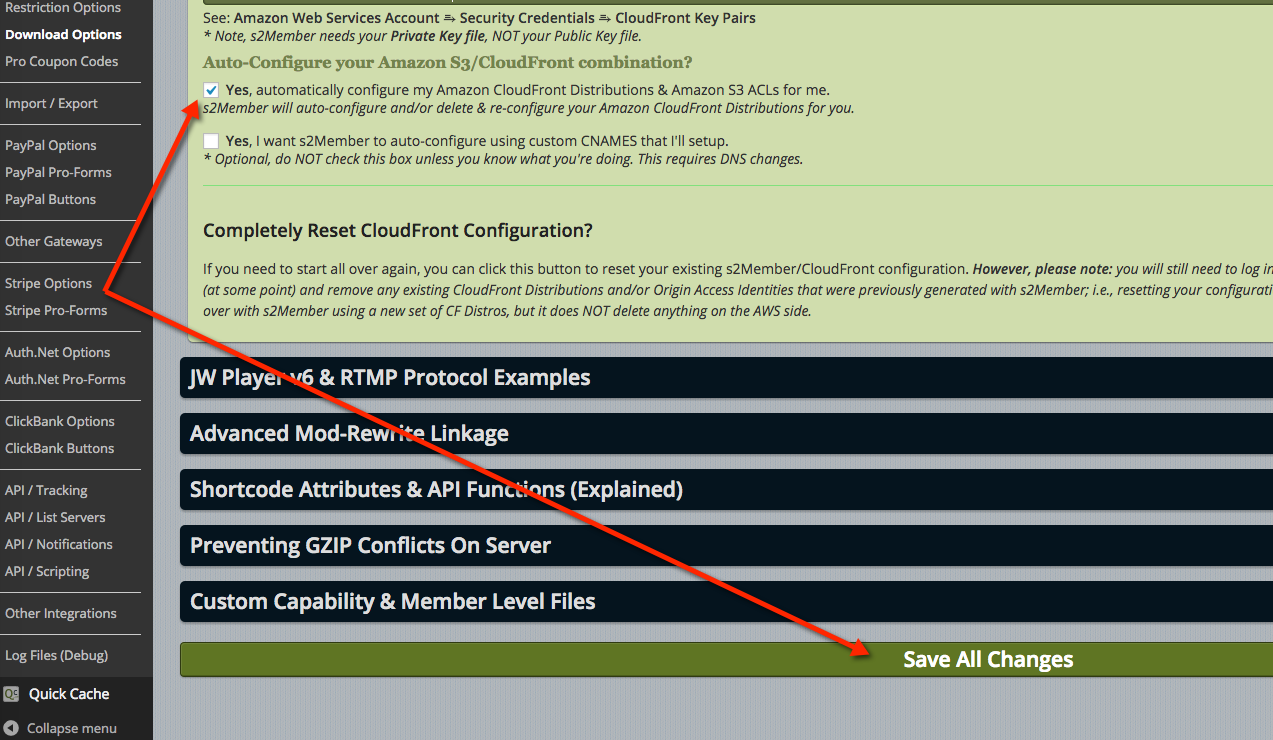
Step 3: Tell s2Member to Auto-Configure S3/CloudFront for You
Dev Note w/Technical Details: s2Member’s auto-configuration routines for Amazon CloudFront are designed to create & configure various components in your Amazon Web Services account, which are all requirements for you to serve protected files through the Amazon S3/CloudFront combination. These components include: an Origin Access Identity, read permissions for the Origin Access Identity, and two private content Distributions. One private content Distribution for file downloads, and another private content Distribution for streaming media files; both connected to and sourced by your Amazon S3 Bucket. In addition, s2Member will automatically configure an ACL & Policy (i.e., permissions) for your Amazon S3 Bucket to make sure your protected object/files are NOT available to the public.
Propagation Time: After you’ve integrated Amazon CloudFront, please wait at least 30 minutes before attempting to test audio/video files. You will need to give Amazon CloudFront some time to fully deploy your CloudFront Distributions. Thirty minutes is usually enough. However, if you’re having trouble, please be patient and wait another 30 minutes or so.
Uploading Sample Audio/Video Files
I’m attaching a ZIP file to this article that contains both the audio.mp3 and video.mp4 sample files I used for this tutorial. Please download audio-video-samples.zip. Extract the samples and upload them to your S3 Bucket please. If you have not integrated with Amazon S3 please upload the examples to your website instead. They should be uploaded locally, to this security-enabled directory that comes with s2Member. Upload to: /wp-content/plugins/s2member-files/
Uploading Sample Audio/Videos Files to Your Amazon S3 Bucket
See: Amazon Management Console → S3 Console → [Choose Bucket] → Click Upload
Installing JW Player v7
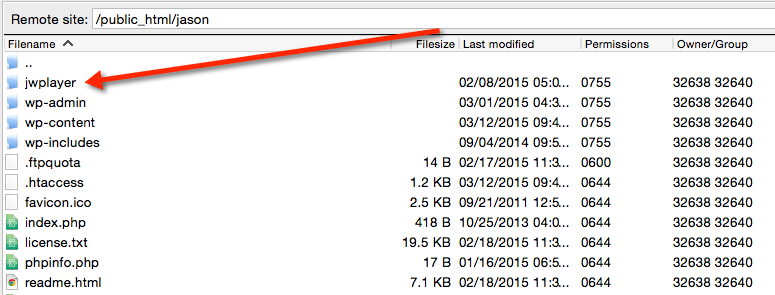
Create an account at JWPlayer.com. Once logged-in, visit this page to Download JW Player (the self-hosted version). Unzip and upload the /jwplayer folder to the root of your website via FTP. We recommend FileZilla for this.
[s2Stream /] Shortcode Examples
JW Player v7 (HTTP MP4 Video via Rewrite URLs; S3/CloudFront Not Required)
Please follow this example if you are not integrating with Amazon CloudFront, only with Amazon S3. Or, if you have not integrated with either of these services, and you’re simply serving protected audio/video files from the local /s2member-files/ directory. This works with any audio/video file. This does not require s2Member to be integrated with Amazon S3/CloudFront. If you’ve integrated with Amazon S3, that’s fine; but it’s not a requirement for this to function properly. Audio/video will play fine via HTTP. However, this is NOT a true RTMP stream.
Copy/paste this Shortcode into any WordPress Post or Page
[s2Stream player="jwplayer-v7" player_path="/jwplayer/jwplayer.js" player_width="480" player_height="270" file_download="video.mp4" rewrite="yes" /]
There are many shortcode attributes that can be customized. See documentation below for more information.
JW Player v7 (RTMP Stream + MP4 Video Fallback; Both S3/CloudFront Required)
This is a true RTMP stream. Plus, s2Member will use a full download of the MP4 video file as a fallback on devices that do not support RTMP streams (e.g., mobile phones and some tablets). When you set player="jwplayer-v7-rtmp" (as seen in the example below), you must have both Amazon S3/CloudFront integrated with s2Member; i.e., RTMP requires Cloudfront, and Cloudfront requires Amazon S3.
Copy/paste this shortcode into any WordPress Post or Page.
[s2Stream player="jwplayer-v7-rtmp" player_path="/jwplayer/jwplayer.js" player_width="480" player_height="270" file_download="video.mp4" /]
There are many shortcode attributes that can be customized. See documentation below for more information.
JW Player v7 (RTMP Video Stream Only; Both S3/CloudFront Required)
This is a true RTMP stream, and only an RTMP stream. s2Member will not use a full download of the MP4 video file as a fallback on devices that do not support RTMP streams. When you set player="jwplayer-v7-rtmp-only" (as seen in the example below), you must have both Amazon S3/CloudFront integrated with s2Member; i.e., RTMP requires Cloudfront, and Cloudfront requires Amazon S3.
Copy/paste this shortcode into any WordPress Post or Page.
[s2Stream player="jwplayer-v7-rtmp-only" player_path="/jwplayer/jwplayer.js" player_width="480" player_height="270" file_download="video.mp4" /]
There are many shortcode attributes that can be customized. See documentation below for more information.
JW Player v7 (HTTP MP3 Audio via Rewrite URLs; S3/CloudFront Not Required)
Please follow this example if you are not integrating with Amazon CloudFront, only with Amazon S3. Or, if you have not integrated with either of these services, and you’re simply serving protected audio/video files from the local /s2member-files/ directory. This works with any audio/video file. This does not require s2Member to be integrated with Amazon S3/CloudFront. If you’ve integrated with Amazon S3, that’s fine; but it’s not a requirement for this to function properly. Audio/video will play fine via HTTP. However, this is NOT a true RTMP stream.
Copy/paste this shortcode into any WordPress Post or Page.
[s2Stream player="jwplayer-v7" player_path="/jwplayer/jwplayer.js" player_width="480" player_height="270" file_download="audio.mp3" rewrite="yes" /]
There are many shortcode attributes that can be customized. See documentation below for more information.
JW Player v7 (RTMP Stream + MP3 Audio Fallback; Both S3/CloudFront Required)
This is a true RTMP stream. Plus, s2Member will use a full download of the MP3 audio file as a fallback on devices that do not support RTMP streams (e.g., mobile phones and some tablets). When you set player="jwplayer-v7-rtmp" (as seen in the example below), you must have both Amazon S3/CloudFront integrated with s2Member; i.e., RTMP requires Cloudfront, and Cloudfront requires Amazon S3.
Copy/paste this shortcode into any WordPress Post or Page.
[s2Stream player="jwplayer-v7-rtmp" player_path="/jwplayer/jwplayer.js" player_width="480" player_height="270" file_download="audio.mp3" /]
There are many shortcode attributes that can be customized. See documentation below for more information.
JW Player v7 (RTMP Audio Stream Only; Both S3/CloudFront Required)
This is a true RTMP stream, and only an RTMP stream. s2Member will not use a full download of the MP3 audio file as a fallback on devices that do not support RTMP streams. When you set player="jwplayer-v7-rtmp-only" (as seen in the example below), you must have both Amazon S3/CloudFront integrated with s2Member; i.e., RTMP requires Cloudfront, and Cloudfront requires Amazon S3.
Copy/paste this shortcode into any WordPress® Post or Page.
[s2Stream player="jwplayer-v7-rtmp-only" player_path="/jwplayer/jwplayer.js" player_width="480" player_height="270" file_download="audio.mp3" /]
There are many shortcode attributes that can be customized. See documentation below for more information.
[s2Stream /] Shortcode Attributes Explained
file_download="video.mp4"Required. This is the location of the audio/video file, relative to the/s2member-files/directory. Or, relative to the root of your Amazon S3 Bucket, when applicable.player="jwplayer-v7-rtmp"Required. Current supported players in this shortcode include:jwplayer-v7orjwplayer-v6: Works with any audio/video file, and you do not need to have Amazon S3 or CloudFront integrated for this to work).jwplayer-v7-rtmporjwplayer-v6-rtmp: Streams with the RTMP protocol plus there is a full download fallback of the source file if streaming is not possible on a particular device. This requires both Amazon S3 and CloudFront integration.jwplayer-v7-rtmp-onlyorjwplayer-v6-rtmp-only: Streams with the RTMP protocol only, with no access to the source file, only to the RTMP stream. This requires both Amazon S3 and CloudFront integration.
player_id=""Optional. HTML div ID for the audio/video player. Defaults to a unique ID generated by s2Member for each instance of your shortcode.player_path="/jwplayer/jwplayer.js"Required. Path to the player’s JavaScript file (e.g.,/jwplayer/jwplayer.js). You should upload the self-hosted/jwplayerfolder to the root of your web directory.player_resolutions=""Optional (requires s2Member Pro). This is a comma-delimited list of all available resolution options; should you decide to offer more than just one file download at a single resolution. This can be tricky to setup, so please read carefully.In order to offer multiple resolution options you should make additional variations available by uploading those variations to the same directory where
file_download=""lives. In addition, when you useplayer_resolutions="", each of your files (including the one you specify infile_download="") must end with-r{resolution option value}; where{resolution option value}must begin with a numeric resolution (in height) followed by any label you prefer. For example:-r720p-HDor maybe-r1080p-HD. The full file names would be:video-r720p-HD.mp4andvideo-r1080p-HD.mp4.Here is a Quick Example:
[s2Stream file_download="video-r720p-HD.mp4" player_resolutions="r720p-HD,r1080p-HD,r480p-SD" player_aspectratio="16:9" /]Note: Each of these files must exist on the server (i.e., you must create the additional resolutions and upload all of them for this to work properly). In this example I would need to render and upload the following files:
video-r720p-HD.mp4,video-r1080p-HD.mp4,video-r480p-SD.mp4.For video files served over HTTP, the default resolution will be the one you list first in the comma-delimited list:
player_resolutions="r720p-HD,r1080p-HD,r480p-SD". In this example the default resolution would be:video-r720p-HD.mp4.For video files served over the RTMP protocol (i.e.,
player="jwplayer-v7-rtmp"orplayer="jwplayer-v7-rtmp-only"), the default resolution will be chosen dynamically based on the bandwidth capability of the connecting visitor; i.e., the default resolution is chosen automatically using the best resolution possible for the device that is currently viewing.Tip: When using
player_resolutions=""it is always a good idea to defineplayer_aspectratio="". The default aspect ratio is16:9if you don’t. While that default value might work for most, if your aspect ratio is different you should define it explicitly; e.g.,player_aspectratio="ww:hh".player_{setting}=""Optional. Any additional attributes supported by your audio/video player, prefixed withplayer_. For JW Player, see this article please.Here are a few JW Player examples:
player_key="my-license-key"player_width="480"player_height="270"player_title="My Video"player_description="A video about something."player_image="http://www.example.com/video-preview.jpg"player_mediaid="ei0wsx23"player_autostart="true"- JW Player v6 skin:
player_skin="/jwplayer/my-skin.xml" - JW Player v7 skinning is done using an Advanced Option Block (see below).
- JW Player v6 captions:
player_captions="{file:'/assets/captions-en.vtt',label:'English'}"With Captions you can exclude the square array brackets to avoid shortcode parsing issues. s2Member will automatically wrap your Caption objects with square array brackets. - JW Player v7 captions via tracks:
player_tracks="{kind:'captions',file:'/assets/captions-en.vtt',label:'English'}"With Captions you can exclude the square array brackets to avoid shortcode parsing issues. s2Member will automatically wrap your Track objects with square array brackets.
↑ Please note that “Advanced Options Blocks” (see: JW Player KB article) are not supported here. For those, please use:
player_option_blocks=""(additional details below).Also, please note that some of these example settings actually get inserted into a
playlist:[]object property for JW Player. s2Member handles all of that for you automatically. All you do is supply any of these settings you’d like to define. They are all optional. To clarify further, s2Member implements theplaylist:[]object property itself. Therefore, you cannot define your ownplaylist:[](not even w/ Advanced Option Blocks). The playlist is generated by s2Member based on yourfile_download=""attribute and other settings.For instance, the following example settings from above actually work together inside a
playlist:[]object property generated by s2Member; i.e.,player_title,player_image,player_mediaid,player_descriptionandplayer_captions. The resultingplaylist:[]that is generated by s2Member will always contain a single item, but perhaps with multiple sources—depending on whichplayer=""you’ve chosen (i.e.,jwplayer-v7,jwplayer-v7-rtmp, orjwplayer-v7-rtmp-only); and also depending on whether or not you have configured multipleplayer_resolutions="".player_option_blocks=""Optional. Any “Advanced Option Blocks” supported by your audio/video player. If you're using JW Player v7, the best use case forplayer_option_blocks=""is for skinning.For JW Player, see this article please.
Here are a few JW Player examples:
player_option_blocks="skin:{name:'myskin'}"(JW Player v7 only).player_option_blocks="sharing:{}"(enables social sharing functionality).player_option_blocks="sharing:{},logo:{file:'/logo.png',link:'http://example.com'}"player_option_blocks="c2hhcmluZzoge30="Base64 encoded version ofsharing:{}.
Please note that “Advanced Options Blocks” can be defined in plain text or with a base64 encoded string. Advanced Option Blocks are JavaScript objects with properties. If you have any trouble defining JavaScript object properties inside a shortcode attribute, please use this tool to base64 encode your Advanced Option Blocks, so that you end up with a string that’s compatible with shortcode attributes.
Note: You cannot define a
playlist:[]option block. See notes above regarding the way s2Member auto-generates theplaylist:[]option block based on other settings you define with the s2Stream shortcode. Also, Captions should not be defined here, because those go into aplaylist:[]. Please useplayer_captionsinstead (see example above).
Additional Attributes Inherited From The [s2File /] Shortcode
All of these work with the [s2Stream /] shortcode also.
download_key="no"Defaults tono. Ifdownload_key="1|on|yes|true|ip-forever|universal", s2Member will authenticate access to the audio/video content through an auto-generated File Download Key. You don’t need to generate the File Download Key yourself, s2Member does it for you. This means that a user does not need to be logged into the site to view the audio/video, because you’re providing them with a Key which grants them access automatically.If you set
download_key="ip-forever", the File Download Key that s2Member generates will last forever, for a specific IP Address. Otherwise, by default, all File Download Keys expire after 24 hours automatically.If you set
download_key="universal", s2Member will generate a File Download Key that is good for anyone/everyone forever, with no restrictions on who/where/when a file is accessed (i.e., be careful with this one).storage=""Defaults to an empty string. Ifstorage="local|s3|cf", s2Member will serve the file from a specific source location, based on the value of this shortcode attribute. For example, if you’ve configured Amazon S3 and/or CloudFront, but there are a few files that you want to upload locally to the/s2member-files/directory; you can force s2Member to serve a file from local storage by settingstorage="local"explicitly.ssl=""Defaults to an empty string. Ifssl="1|on|yes|true", s2Member will serve the audio/video file over the SSL protocol (i.e., the URL will start withhttps://orrtmpe://—if you’re serving an RTMP stream). If empty, s2Member will only serve the file over the SSL protocol when/if the Post/Page/URL firing the shortcode itself is also being viewed over SSL. Otherwise, s2Member will use a non-SSL protocol by default.rewrite="yes"Defaults toyes. Ifrewrite="1|on|yes|true", s2Member will generate an audio/video URL (for HTTP content served from the/s2member-files/directory), which takes full advantage of s2Member’s Advanced Mod Rewrite functionality. If you’re running an Apache web server, or another server that supportsmod_rewritewe highly recommend turning this on. s2Member’smod_rewriteURLs do not contain query string parameters; making them more portable/compatible with other software applications and/or plugins for WordPress.If you’re integrating with JW Player you must use
rewrite="yes", otherwise you will have errors because JW Player can’t deal with query string parameters.Note: This setting has no impact on Amazon S3/CloudFront integrations when used together with the
[s2Stream /]shortcode. It only affects instances of the[s2Stream /]shortcode where you haveplayer="jwplayer-v7"(and only if you're serving files from the local/s2member-files/directory).rewrite_base=""Defaults to an empty string. Ifrewrite_base="http://www.example.com/", s2Member will generate an audio/video URL that takes full advantage of s2Member’s Advanced Mod Rewrite functionality, and it will use the rewrite base URL as a prefix.This could be useful on some WordPress installations that use advanced directory structures. It could also be useful for site owners using virtual directories that point to
/s2member-files/.Note, if
rewrite_baseis set, s2Member will automatically forcerewrite="yes"for you.count_against_user="yes"Defaults toyes. Ifcount_against_user="1|on|yes|true", it will automatically forcecheck_user="true"as well. In other words, s2Member will authenticate the current user, and if authenticated, count the audio/video file against the current user’s account record in real-time (i.e., as the audio/video is being served).There is really very little reason to change the value of this (you want it set to yes). If you’re serving audio/video files you want those to count against whoever is accessing them. This way s2Member’s download counters will work effectively against your Basic Download Restrictions, as configured with s2Member.
check_user="yes"Defaults toyes. Ifcheck_user="1|on|yes|true", s2Member will authenticate the current user before allowing the audio/video file to be accessed.There is really very little reason to change the value of this (you want it set to yes). If you’re serving audio/video files you want to authenticate the current user, and you want the audio/video files being served to count against whoever is accessing them. This way s2Member’s download counters will work effectively against your Basic Download Restrictions, as configured with s2Member.
Mobile Devices: [s2Stream /] Shortcode & JW Player Considerations
Set player_width="100%" and player_aspectratio="ww:hh" (not required, but definitely a good idea). Also force the primary player object to html5 which uses a <video> tag if at all possible; as opposed to Flash™ as the default primary that s2Stream uses in order to support RTMP (not required either, but helps prevent issues in JW Player auto-detection).
Mobile Support w/ s2Stream (Example)
[s2Stream player="jwplayer-v7" player_path="/jwplayer/jwplayer.js" player_primary="html5" player_width="100%" player_aspectratio="12:5" file_download="video.mp4" /]
See also: Browser & Device Reference
Problems Site Owners Have w/ Mobile Devices
- Some site owners try to serve RTMP files on mobile devides, which is not widely supported at this time.
- Or, they use the s2Stream shortcode w/o setting
player_primary="html5". The default primary isflash, and Flash is not widely supported on mobile devices at this time. - Or, they are trying to serve audio/video files from local storage (e.g., from
/s2member-files) instead of serving this media via S3 or CloudFront—which is always better. Why? Depending on server configuration, there is always a chance that s2Member’s PHP-based file delivery from local storage may not be compatible with certain versions of Android/iOS. Always better to serve media from a CDN so it can be delivered statically (i.e., what most mobile devices expect to deal with). In short, if you want to support a wide range of devices go with a dedicated media server. That's what the S3/Cloudfront combination is.
How to Support Mobile Devices (Best Practices)
- Host all of your media in an S3 bucket and do not host it locally. Not required but this helps to avoid issues. It's always better to serve media from a CDN so it can be delivered statically (i.e., what most mobile devices expect to deal with). In short, if you want to support a wide range of devices go with a dedicated media server. That's what the S3/Cloudfront combination is.
- Set
player_width="100%"andplayer_aspectratio="16:9"(or whatever aspect ratio is appropriate). Neither of these are required, but this helps to avoid issues. - Set
player_primary="html5"(not required, but this helps to avoid issues). - Don't use RTMP at all. Or, if you do, use it with an MP4 fallback (e.g.,
player="jwplayer-v7-rtmp"). You can useplayer="jwplayer-v7"orplayer="jwplayer-v7-rmtp", but please avoid the use ofplayer="jwplayer-v7-rtmp-only"if you want to support mobile devices; i.e., if you want to support mobile devices you need to allow MP4 as a fallback. Most mobile devices can’t play files over the RTMP protocol.
Advanced Techniques (WordPress Theme Integration)
Shortcodes are great. Simple, easy-to-use, and they don’t cause problems with the WP Visual Editor. However, if you’re trying to integrate s2Member’s functionality into a theme file you might find the following ideas useful.
Idea 1: Integrating A Shortcode via PHP code
<?php echo do_shortcode('[s2Stream player="jwplayer-v7-rtmp" ... /]'); ?>
See: http://codex.wordpress.org/Function_Reference/do_shortcode
Idea 2: Integrating Your Own JW Player JavaScript
See also: s2member_file_download_url().
<?php
// Configuration.
$s2_jw_config['jwplayer']            = '/jwplayer/'; // Relative URL path to JW Player files directory.
$s2_jw_config['mp4_video_file_name'] = 'video.mp4'; // Name of your MP4 test file.
// Don't edit anything else below unless you know what you're doing.
?>

    <div id="jw-container">JW Player appears here.</div>
    <script type="text/javascript" src="<?php echo $s2_jw_config["jwplayer"]; ?>jwplayer.js"></script>
    <script>jwplayer.key = 'YOUR KEY HERE';</script>

<?php // A direct URL to the RTMP source; counting the file against the current User in real-time.
$cfg = array('file_download' => $s2_jw_config['mp4_video_file_name'], 'url_to_storage_source' => TRUE, 'count_against_user' => TRUE); ?>

<?php // API Function `s2member_file_download_url()` returns false if access is denied to the current User.
if(($mp4 = s2member_file_download_url($cfg, 'get-streamer-array'))): ?>

    <script type="text/javascript">
        jwplayer('jw-container').setup({
                                           playlist: [{
                                                          sources: [
                                                              {type: 'rtmp', file: '<?php echo $mp4['streamer']; ?>/mp4:<?php echo $mp4['file']; ?>'},
                                                              {type: 'mp4', file: '<?php echo $mp4['url']; ?>'}
                                                          ]
                                                      }],
                                           primary : 'flash', width: 480, height: 270
                                       });
    </script>

<?php else: /* Access is denied to the current User. */ ?>
    Sorry, you do NOT have access to this file.
<?php endif; ?>
Limitations when running on Nginx
If your site is powered by the Nginx web server, you must use the Amazon S3/CloudFront integration to host your files. You cannot serve files locally.
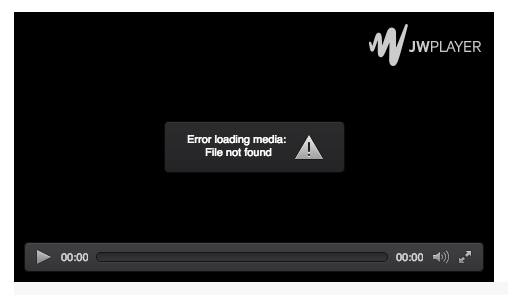
If your site is running on Nginx and you try to use the [s2Stream /] shortcode with storage="local" to serve files from the wp-content/plugins/s2member-files/ directory (the default behavior if you haven't configured Amazon S3/CloudFront in s2Member), then you will get an "Error loading media: File not found" error like the following from JW Player:
The solution is to configure Amazon S3/CloudFront integration as described above and upload your files to Amazon S3/CloudFront.
If you're not sure if your site is running on Nginx, please contact your web hosting company to find out.
