Aug, 2015
Basic User/Member Import/Export Guide
With s2Member, you can easily Import and Export your User/Member information to a CSV file, a 'Comma-Separated Values' file. (A CSV file is a simple text file that can be read with any text editor or spreadsheet program, such as Excel.) You may want to use the Import/Export tools for simple backup purposes, or to easily make many changes to user/member information and then re-import those changes into s2Member. This short guide will explain how to export and import user/member information.
Note: The Import/Export tools are an s2Member Pro feature.
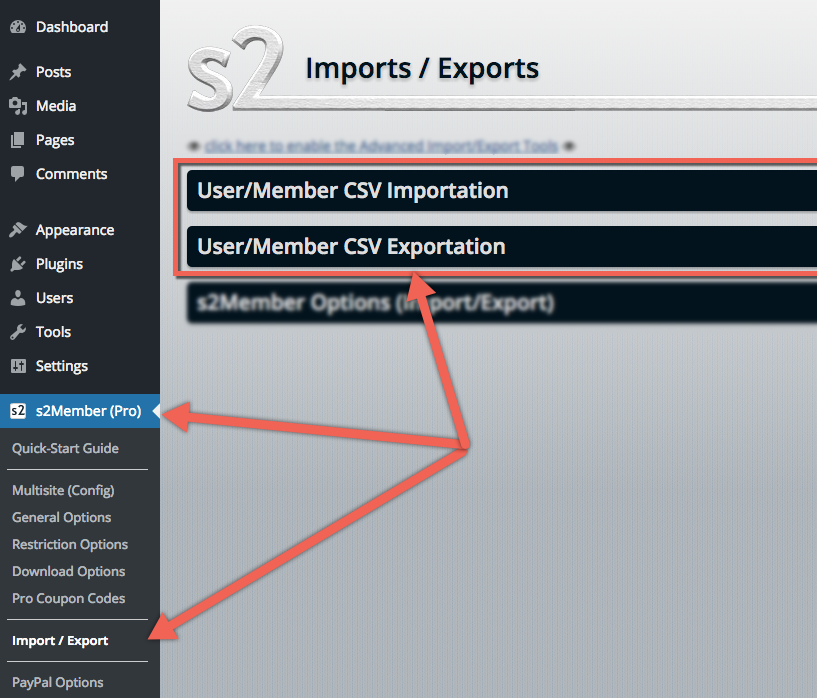
To get started, visit WordPress Dashboard → s2Member → Import/Export. You'll notice there are three option panels there; we're only going to deal with the two related to User/Member Import/Export in this guide.
Exporting User/Member Information
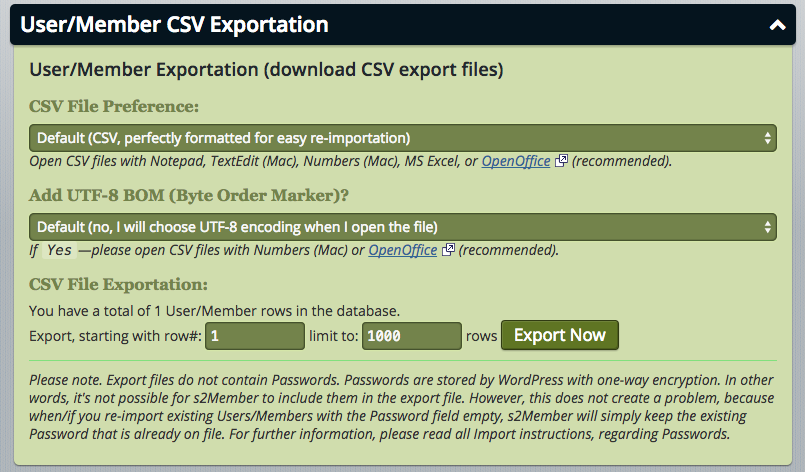
Click on the panel that says User/Member CSV Exportation to expand that panel. This panel allows us to download (export) a copy of all user/member information inside our WordPress site (i.e., all of the information related to all users found in WordPress Dashboard → Users).
The default settings work just fine for most site owners and usually all you need to do is click Export Now to have s2Member generate the CSV file and then prompt you to download it. However, let's go through the available options on this screen.
- CSV File Preference. The default option,
Default (CSV)..., is required if you want to re-import the CSV file. If you are exporting user/member information for backup purposes or to change and re-import data, you must leave this set toDefault (CSV).... Otherwise, if you only want to download the information to view it, or to print it out, you may prefer the second option,Easy-Read, which exports the data in a format that is more human-readable. - Add UTF-8 BOM (Byte Order Marker)?. The default here is,
No, which means that when you open the CSV file with Excel or a similar spreadsheet program, you will need to ensure that "UTF-8 encoding" is selected (most programs will prompt you for the encoding type when opening a CSV file). If you are using a Mac or if you're using OpenOffice, we recommend changing this option toYes, as programs on a Mac often don't prompt you for the encoding type. - CSV File Exportation. Again, the default here is usually fine. This option simply allows you to choose how many members you want to export. If you have more than 1,000 members, you may want to backup the information in segments (e.g., 1 - 1000, 1001 - 2000, etc.). If you have less than 1000 members and you want to export all member information, leave this setting at the default.
Importing User/Member Information
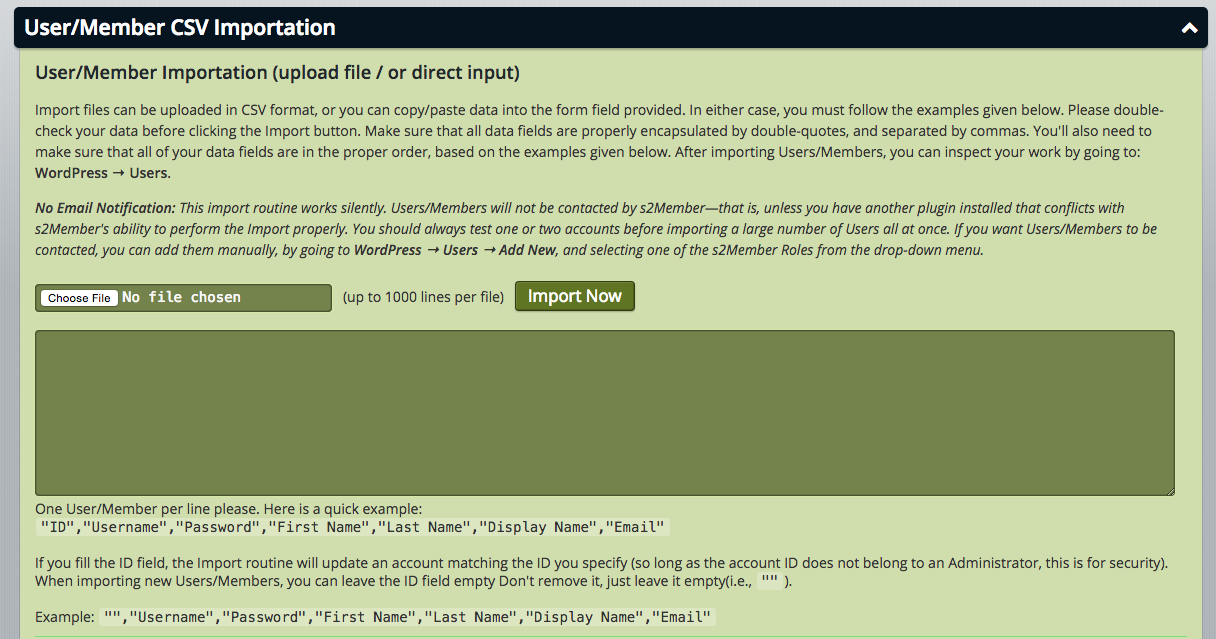
Click on the panel that says User/Member CSV Importation to expand that panel. This panel allows us to upload (import) an existing CSV file that contains user/member information, either from a backup you made by exporting, or from a file you may have generated manually (see Importing/Updating Users).
To import an existing CSV file, simply click the "Choose File" button, locate and select the CSV file on your computer, and then click the "Import Now" button. s2Member will then import the data from the CSV file. If you are updating existing member information, s2Member will simply update the changed values. If you are adding new members, s2Member will create the new users.
You can also paste or type information into the box below the "Import Now" button instead of selecting a CSV file. The information in the box must follow the same format as the CSV file. For example, to create a new user you would use the following format. (Note how the first field is empty; that indicates you are creating a new user. If you were updating an existing user, that first field would contain the database ID of the user you are updating.)
"","Username","Password","First Name","Last Name","Display Name","Email"
For more information on the precise format the CSV file should follow, and many more examples, please see the Importing/Updating Users KB article.


