Jun, 2016
Configuring s2Member Support for ClickBank
Table of Contents
This Knowledge Base Article covers configuring s2Member to work with ClickBank. ClickBank is a secure online retail outlet for more than 70,000 digital product vendors and 110,000 active affiliate marketers. ClickBank makes a sale somewhere in the world every three seconds, safely processing more than 27,000 digital transactions a day. They serve more than 200 countries and rank as one of the most highly-trafficked sites on the web.
s2Member has been integrated with ClickBank for Direct Payments and also for Recurring Billing. To take advantage of this integration, you will need to have a ClickBank Merchant Account. Once you have an account, you can find the details required to configure s2Member support for ClickBank in your ClickBank Merchant Account.
This article is part of the s2Member User's Guide, a series of articles that cover the fundamentals of using s2Member.
Configuring ClickBank Account Details
See WordPress Dashboard → s2Member (Pro) → ClickBank Options → ClickBank Account Details.
This information is REQUIRED (if you are using ClickBank).
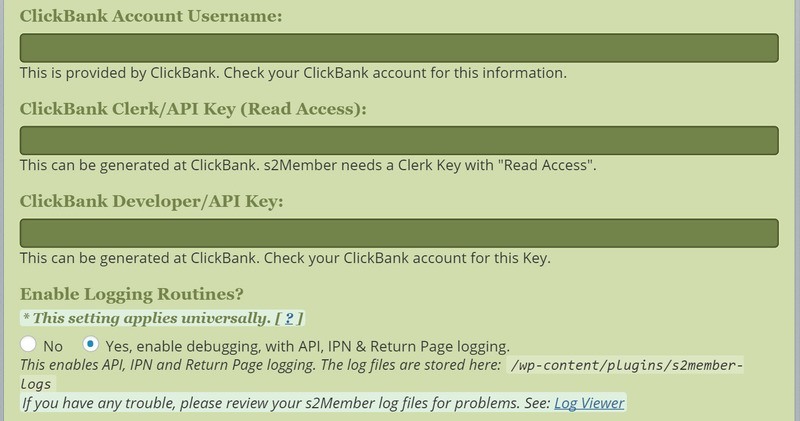
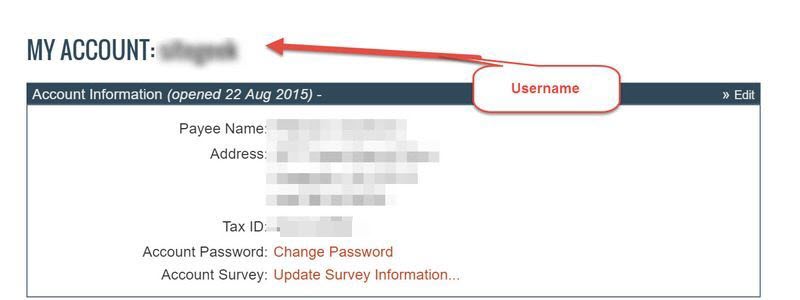
- ClickBank Account Username: This is available in your ClickBank Merchant Account. See ClickBank Merchant Account → Settings → My Account
ClickBank Clerk/API Key (Read Access)
See ClickBank Merchant Account → Settings → Clerk API Keys. If you do not already have a Clerk API Key in your ClickBank Merchant Account you can generate one. Click the Edit link in the top-right corner of the Clerk API Keys panel on the ClickBank web page. Then click the red button that says CREATE NEW CLERK USER API KEY.
Give your Clerk User API Key a name in the Description box. This key requires Read access. Enable Read access by clicking on the Orders/Tickets Read box. Then click the Save button. Copy the key from your ClickBank Merchant Account into s2Member.
ClickBank Developer/API Key
See ClickBank Merchant Account → Settings → Developer API Keys. If you do not already have a Developer API Key in your ClickBank Merchant Account, you can generate one. Click the Edit link in the top-right corner of the Developer API Keys panel on the ClickBank web page. Then click the red button that says CREATE NEW DEVELOPER KEY.
Give your Developer API Key a name in the Description box. Then click the Save button. Copy the key from your ClickBank Merchant Account into s2Member.
ClickBank IPN v2.1 or v6 Integration
See WordPress Dashboard → s2Member (Pro) → ClickBank Options → ClickBank IPN v2.1 or v6 Integration.
This information is REQUIRED (if you are using ClickBank).
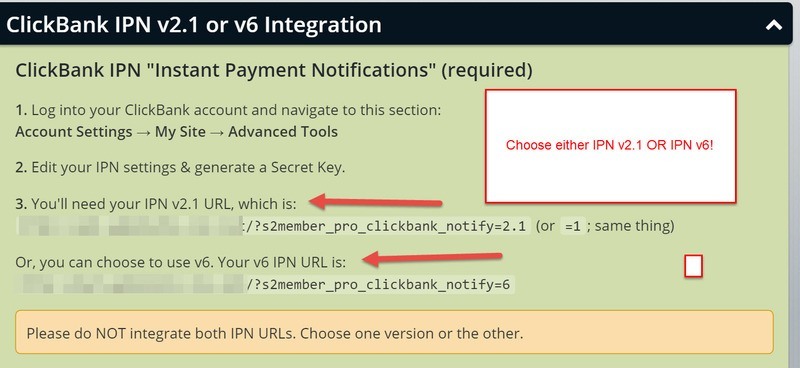
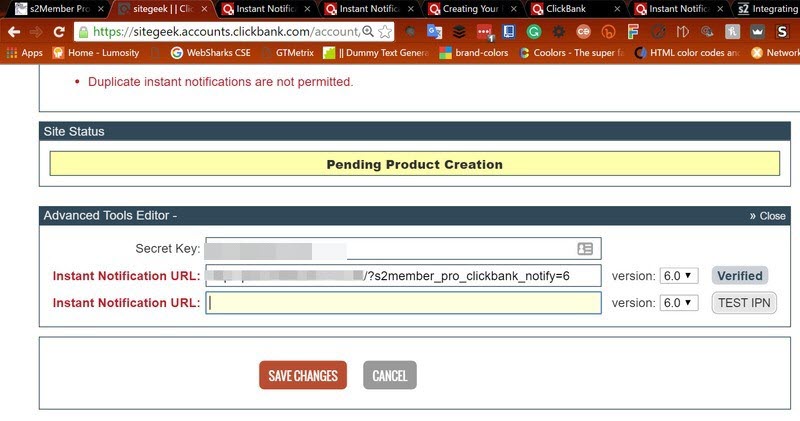
Log into your ClickBank Merchant Account and navigate to Account Settings → My Site → Advanced Tools. Click the Edit button in the top right-hand corner of the Advanced Tools box.
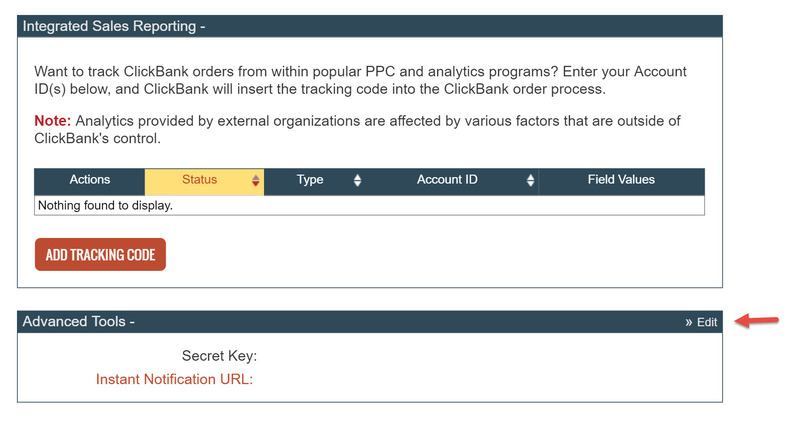
Enter your Secret Key in the Secret Key box and click the Save Changes button. Note: Your Secret Key may be no more than sixteen alpha-numeric characters in length and must be in ALL CAPS.
Once you’ve added your Secret Key, click the Request Access link. Read and answer Yes to all of the questions on the form. You also need to read the Terms of Service and acknowledge them before clicking the SAVE CHANGES & REQUEST API ACCESS button.
After you’ve created your Secret Key and been granted IPN access click the Edit button in the top right-hand corner of the Advanced Tools box again. Copy the v6 IPN URL from the s2Member ClickBank IPN v2.1 or v6 Integration panel into the two boxes on the Account Settings → My Site → Advanced Tools webpage. Then click the Save Changes button.
ClickBank Thank-You Page
See WordPress Dashboard → s2Member (Pro) → ClickBank Options → ClickBank Thank-You Page.
This information is REQUIRED (if you are using ClickBank).

Whenever you create Products at ClickBank, you must supply a Thank-You Page. This page is where a Customer lands after they complete checkout. s2Member handles this dynamically so that you can use the same Thank-You Page for all of your ClickBank Products.
As long as you follow the instructions provided under WordPress Dashboard → s2Member (Pro) → ClickBank Buttons, s2Member handles Thank-You Page and IPN (Instant Payment Notifications) for you automatically. The integration from ClickBank → s2Member is seamless.
Thank-You Page Template (optional customizations)
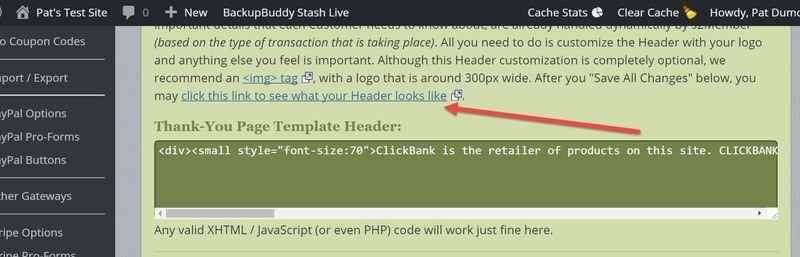
See WordPress Dashboard → s2Member (Pro) → ClickBank Options → ClickBank Thank-You Page → Thank-You Page Template (optional customizations).
With s2Member Pro installed you have the ability to customize your Thank-You Page Template. Each of your Customers returns to your site immediately after they complete checkout at ClickBank. Your Thank-You Page displays a message and instructions for the Customer. s2Member may change the message and instructions dynamically, based on the type of transaction that is taking place. We do not recommend that you attempt to modify the message and instructions presented dynamically by s2Member, but you can certainly control the Header and the overall appearance of s2Member's Thank-You Page Template.
The easiest way to do this is to add some HTML code in the box here (WordPress Dashboard → s2Member (Pro) → ClickBank Options → ClickBank Thank-You Page → Thank-You Page Template (optional customizations)). For instance, you might include an <img> tag with your logo. This s2Member panel allows you to customize the Header section of s2Member's default Thank-You Page Template.
Everything else, including the textual response and other important details that each Customer needs to know about, are handled dynamically by s2Member based on the type of transaction that is taking place. All you need to do is customize the Header with your logo, and anything else you feel is important. Although this Header customization is optional, we recommend an <img> tag with a logo that is around 300px wide. Once you’ve configured the Header the way you want it, click the link that says click this link to see it looks like to preview your header.
Build Your Own Thank-You Page Template
Alternatively, you can create your own Thank-You Page Template. Just make a copy of s2Member's default template: /wp-content/plugins/s2member/includes/templates/returns/default-template.php. Place your copy of this default template inside your active WordPress theme directory and name the file /clickbank-return.php.
s2Member finds the template and uses it to generate your Thank-You Page. You will find details inside s2Member's default template file.
Bypass s2Member’s Thank-You Page Altogether
If you'd like, you can avoid s2Member's Thank-You Page altogether. You can take s2Member's Thank-You Page URL and add &s2member_pro_ClickBank_return_success=http://... setting the value to a custom Thank-You Page URL.
If you use the &s2member_pro_ClickBank_return_success=http://... parameter in your Thank-You Page URL, the initial redirection back to s2Member's default handler still occurs. However, instead of displaying its Thank-You Page Template to the Customer, s2Member redirects the Customer to your custom URL.